
Spring Boot 入门详解教程之基础篇(二)
一、前言
上一篇《Spring Boot 入门之基础篇(一)》介绍了 Spring Boot 的环境搭建以及项目启动打包等基础内容,本篇继续深入介绍 Spring Boot 与 Web 开发相关的知识。
二、整合模板引擎
由于 jsp 不被 SpringBoot 推荐使用,所以模板引擎主要介绍 Freemarker 和 Thymeleaf。
2.1 整合 Freemarker
2.1.1 添加 Freemarker 依赖
<dependency><groupId>org.springframework.boot</groupId><artifactId>spring-boot-starter-freemarker</artifactId></dependency>
2.1.2 添加 Freemarker 模板配置
在 application.properties 中添加如下内容:
spring.freemarker.allow-request-override=falsespring.freemarker.cache=truespring.freemarker.check-template-location=truespring.freemarker.charset=UTF-8spring.freemarker.content-type=text/htmlspring.freemarker.expose-request-attributes=falsespring.freemarker.expose-session-attributes=falsespring.freemarker.expose-spring-macro-helpers=falsespring.freemarker.prefix=spring.freemarker.suffix=.ftl
上述配置都是默认值。
2.1.3 Freemarker 案例演示
在 controller 包中创建 FreemarkerController:
@Controller@RequestMapping("freemarker")public class FreemarkerController {@RequestMapping("hello")public String hello(Map<String,Object> map) {map.put("msg", "Hello Freemarker");return "hello";}}
在 templates 目录中创建名为 hello.ftl 文件,内容如下:
<!DOCTYPE html><html><head><meta charset="UTF-8"><title>Document</title><link href="/css/index.css" rel="stylesheet"/></head><body><div><h2>${msg}</h2></div></body></html>
结果如下:

2.2 整合 Thymeleaf
2.2.1 添加 Thymeleaf 依赖
在 pom.xml 文件中添加:
<dependency><groupId>org.springframework.boot</groupId><artifactId>spring-boot-starter-thymeleaf</artifactId></dependency>
2.2.2 添加 Thymeleaf 模板配置
在 application.properties 中添加如下内容:
spring.thymeleaf.cache=truespring.thymeleaf.prefix=classpath:/templates/spring.thymeleaf.suffix=.htmlspring.thymeleaf.mode=HTML5spring.thymeleaf.encoding=UTF-8spring.thymeleaf.content-type=text/html
上述配置都是默认值。
2.2.3 Thymeleaf 案例演示
在 controller 包中创建 ThymeleafController:
@Controller@RequestMapping("thymeleaf")public class ThymeleafController {@RequestMapping("hello")public String hello(Map<String,Object> map) {map.put("msg", "Hello Thymeleaf");return "hello";}}
在 template 目录下创建名为 hello.html 的文件,内容如下:
<!DOCTYPE html><html><head><meta charset="UTF-8"><title>Document</title><link href="/css/index.css" rel="stylesheet"/></head><body><div><h2 th:text="${msg}"></h2></div></body></html>
结果如下:

三、整合 Fastjson
3.1 添加依赖
<dependency><groupId>com.alibaba</groupId><artifactId>fastjson</artifactId><version>1.2.35</version></dependency>
3.2 整合 Fastjson
创建一个配置管理类 WebConfig ,如下:
@Configurationpublic class WebConfig {@Beanpublic HttpMessageConverters fastJsonHttpMessageConverters() {FastJsonHttpMessageConverter fastJsonHttpMessageConverter = new FastJsonHttpMessageConverter();FastJsonConfig fastJsonConfig = new FastJsonConfig();fastJsonConfig.setSerializerFeatures(SerializerFeature.PrettyFormat);fastJsonHttpMessageConverter.setFastJsonConfig(fastJsonConfig);HttpMessageConverter<?> converter = fastJsonHttpMessageConverter;return new HttpMessageConverters(converter);}}
3.3 演示案例:
创建一个实体类 User:
public class User {private Integer id;private String username;private String password;private Date birthday;}
getter 和 setter 此处省略。
创建控制器类 FastjsonController :
@Controller@RequestMapping("fastjson")public class FastJsonController {@RequestMapping("/test")@ResponseBodypublic User test() {User user = new User();user.setId(1);user.setUsername("jack");user.setPassword("jack123");user.setBirthday(new Date());return user;}}
打开浏览器,访问 http://localhost:8080/fastjson/test,结果如下图:

此时,还不能看出 Fastjson 是否正常工作,我们在 User 类中使用 Fastjson 的注解,如下内容:
@JSONField(format="yyyy-MM-dd")private Date birthday;
再次访问 http://localhost:8080/fastjson/test,结果如下图:

日期格式与我们修改的内容格式一致,说明 Fastjson 整合成功。
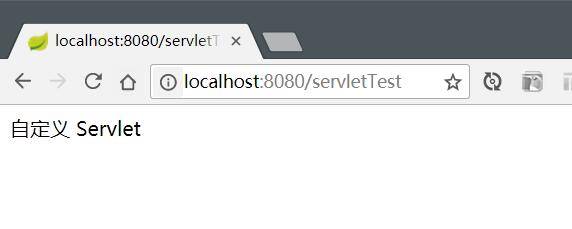
四、自定义 Servlet
4.1 编写 Servlet
public class ServletTest extends HttpServlet {@Overrideprotected void doGet(HttpServletRequest req, HttpServletResponse resp) throws ServletException, IOException {doPost(req, resp);}@Overrideprotected void doPost(HttpServletRequest req, HttpServletResponse resp) throws ServletException, IOException {resp.setContentType("text/html;charset=utf-8");resp.getWriter().write("自定义 Servlet");}}
4.2 注册 Servlet
将 Servelt 注册成 Bean。在上文创建的 WebConfig 类中添加如下代码:
@Beanpublic ServletRegistrationBean servletRegistrationBean() {return new ServletRegistrationBean(new ServletTest(),"/servletTest");}
结果如下:
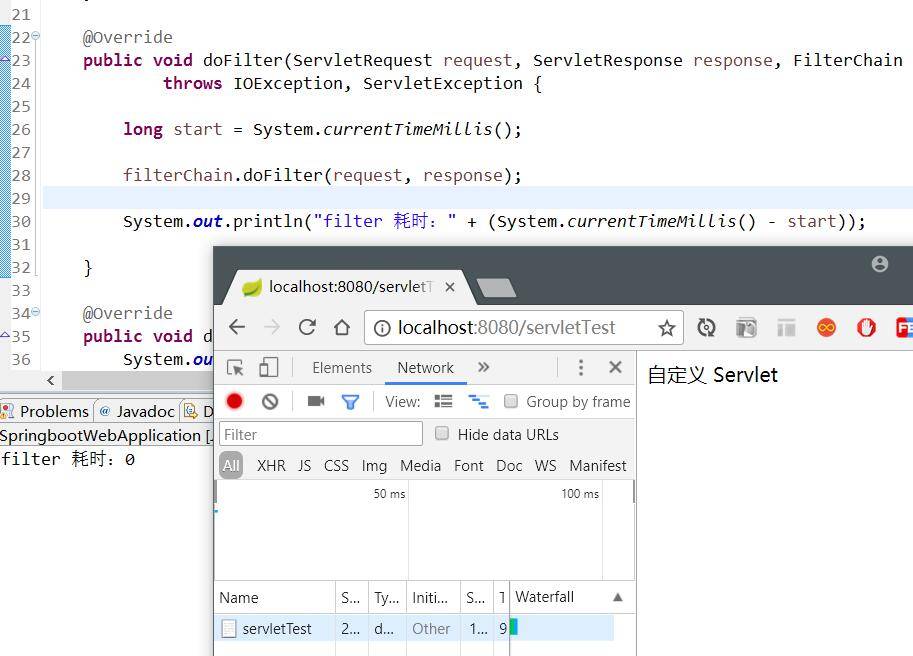
五、自定义过滤器/第三方过滤器
5.1 编写过滤器
public class TimeFilter implements Filter {@Overridepublic void init(FilterConfig filterConfig) throws ServletException {System.out.println("=======初始化过滤器=========");}@Overridepublic void doFilter(ServletRequest request, ServletResponse response, FilterChain filterChain)throws IOException, ServletException {long start = System.currentTimeMillis();filterChain.doFilter(request, response);System.out.println("filter 耗时:" + (System.currentTimeMillis() - start));}@Overridepublic void destroy() {System.out.println("=======销毁过滤器=========");}}
5.2 注册过滤器
要是该过滤器生效,有两种方式:
1) 使用 @Component 注解
2) 添加到过滤器链中,此方式适用于使用第三方的过滤器。将过滤器写到 WebConfig 类中,如下:
@Beanpublic FilterRegistrationBean timeFilter() {FilterRegistrationBean registrationBean = new FilterRegistrationBean();TimeFilter timeFilter = new TimeFilter();registrationBean.setFilter(timeFilter);List<String> urls = new ArrayList<>();urls.add("/*");registrationBean.setUrlPatterns(urls);return registrationBean;}
结果如下:
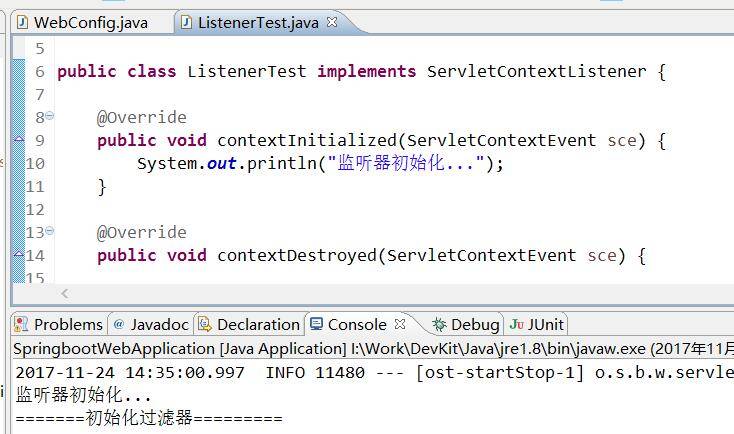
六、自定义监听器
6.1 编写监听器
public class ListenerTest implements ServletContextListener {@Overridepublic void contextInitialized(ServletContextEvent sce) {System.out.println("监听器初始化...");}@Overridepublic void contextDestroyed(ServletContextEvent sce) {}}
6.2 注册监听器
注册监听器为 Bean,在 WebConfig 配置类中添加如下代码:
@Beanpublic ServletListenerRegistrationBean<ListenerTest> servletListenerRegistrationBean() {return new ServletListenerRegistrationBean<ListenerTest>(new ListenerTest());}
当启动容器时,结果如下:
针对自定义 Servlet、Filter 和 Listener 的配置,还有另一种方式:
@SpringBootApplicationpublic class SpringbootWebApplication implements ServletContextInitializer {@Overridepublic void onStartup(ServletContext servletContext) throws ServletException {// 配置 ServletservletContext.addServlet("servletTest",new ServletTest()).addMapping("/servletTest");// 配置过滤器servletContext.addFilter("timeFilter",new TimeFilter()).addMappingForUrlPatterns(EnumSet.of(DispatcherType.REQUEST),true,"/*");// 配置监听器servletContext.addListener(new ListenerTest());}public static void main(String[] args) {SpringApplication.run(SpringbootWebApplication.class, args);}}
七、自定义拦截器
7.1 编写拦截器
使用 @Component 让 Spring 管理其生命周期:
@Componentpublic class TimeInterceptor implements HandlerInterceptor {@Overridepublic boolean preHandle(HttpServletRequest request, HttpServletResponse response, Object handler) throws Exception {System.out.println("========preHandle=========");System.out.println(((HandlerMethod)handler).getBean().getClass().getName());System.out.println(((HandlerMethod)handler).getMethod().getName());request.setAttribute("startTime", System.currentTimeMillis());return true;}@Overridepublic void postHandle(HttpServletRequest request, HttpServletResponse response, Object handler, ModelAndView modelAndView)throws Exception {System.out.println("========postHandle=========");Long start = (Long) request.getAttribute("startTime");System.out.println("耗时:"+(System.currentTimeMillis() - start));}@Overridepublic void afterCompletion(HttpServletRequest request, HttpServletResponse response, Object handler, Exception exception)throws Exception {System.out.println("========afterCompletion=========");Long start = (Long) request.getAttribute("startTime");System.out.println("耗时:"+(System.currentTimeMillis() - start));System.out.println(exception);}}
7.2 注册拦截器
编写拦截器后,我们还需要将其注册到拦截器链中,如下配置:
@Configurationpublic class WebConfig extends WebMvcConfigurerAdapter{@Autowiredprivate TimeInterceptor timeInterceptor;@Overridepublic void addInterceptors(InterceptorRegistry registry) {registry.addInterceptor(timeInterceptor);}}
请求一个 controller ,结果如下:

八、配置 AOP 切面
8.1 添加依赖
<dependency><groupId>org.springframework.boot</groupId><artifactId>spring-boot-starter-aop</artifactId></dependency>
8.2 编写切面类
使用 @Component,@Aspect 标记到切面类上:
@Aspect@Componentpublic class TimeAspect {@Around("execution(* com.light.springboot.controller.FastJsonController..*(..))")public Object method(ProceedingJoinPoint pjp) throws Throwable {System.out.println("=====Aspect处理=======");Object[] args = pjp.getArgs();for (Object arg : args) {System.out.println("参数为:" + arg);}long start = System.currentTimeMillis();Object object = pjp.proceed();System.out.println("Aspect 耗时:" + (System.currentTimeMillis() - start));return object;}}
请求 FastJsonController 控制器的方法,结果如下:

九、错误处理
9.1 友好页面
先演示非友好页面,修改 FastJsonController 类中的 test 方法:
@RestController@RequestMapping("fastjson")public class FastJsonController {@RequestMapping("/test")public User test() {User user = new User();user.setId(1);user.setUsername("jack");user.setPassword("jack123");user.setBirthday(new Date());// 模拟异常int i = 1/0;return user;}}
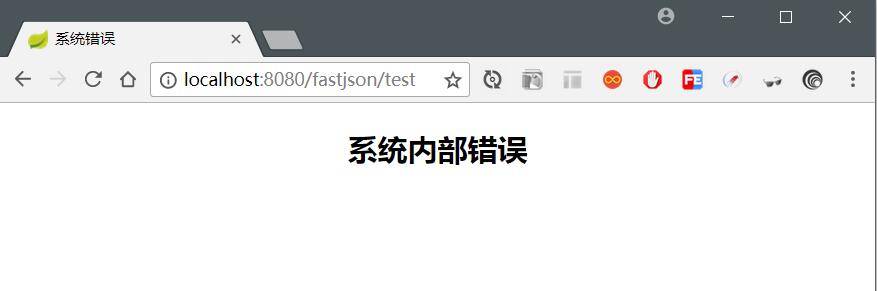
浏览器请求:http://localhost:8080/fastjson/test,结果如下:
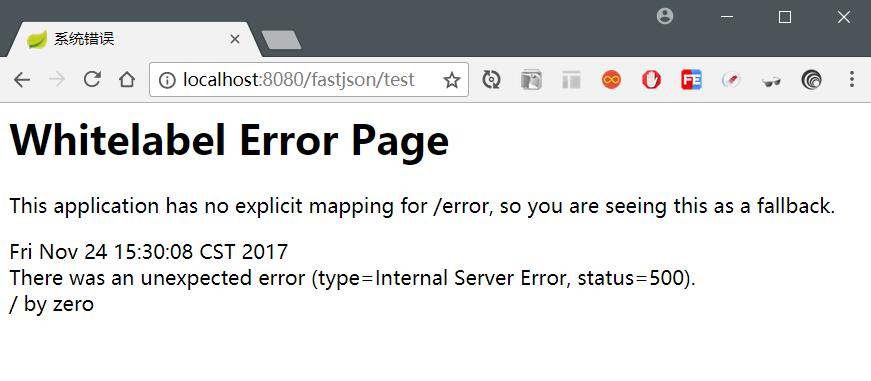
当系统报错时,返回到页面的内容通常是一些杂乱的代码段,这种显示对用户来说不友好,因此我们需要自定义一个友好的提示系统异常的页面。
在 src/main/resources 下创建 /public/error,在该目录下再创建一个名为 5xx.html 文件,该页面的内容就是当系统报错时返回给用户浏览的内容:
<!DOCTYPE html><html><head><meta charset="UTF-8"><title>系统错误</title><link href="/css/index.css" rel="stylesheet"/></head><body><div><h2>系统内部错误</h2></div></body></html>
路径时固定的,Spring Boot 会在系统报错时将返回视图指向该目录下的文件。
如下图:
上边处理的 5xx 状态码的问题,接下来解决 404 状态码的问题。
当出现 404 的情况时,用户浏览的页面也不够友好,因此我们也需要自定义一个友好的页面给用户展示。
在 /public/error 目录下再创建一个名为 404.html 的文件:
<!DOCTYPE html><html><head><meta charset="UTF-8"><title>访问异常</title><link href="/css/index.css" rel="stylesheet"/></head><body><div><h2>找不到页面</h2></div></body></html>
我们请求一个不存在的资源,如:http://localhost:8080/fastjson/test2,结果如下图:

9.2 全局异常捕获
如果项目前后端是通过 JSON 进行数据通信,则当出现异常时可以常用如下方式处理异常信息。
编写一个类充当全局异常的处理类,需要使用 @ControllerAdvice 和 @ExceptionHandler 注解:
@ControllerAdvicepublic class GlobalDefaultExceptionHandler {/*** 处理 Exception 类型的异常* @param e* @return*/@ExceptionHandler(Exception.class)@ResponseBodypublic Map<String,Object> defaultExceptionHandler(Exception e) {Map<String,Object> map = new HashMap<String,Object>();map.put("code", 500);map.put("msg", e.getMessage());return map;}}
其中,方法名为任意名,入参一般使用 Exception 异常类,方法返回值可自定义。
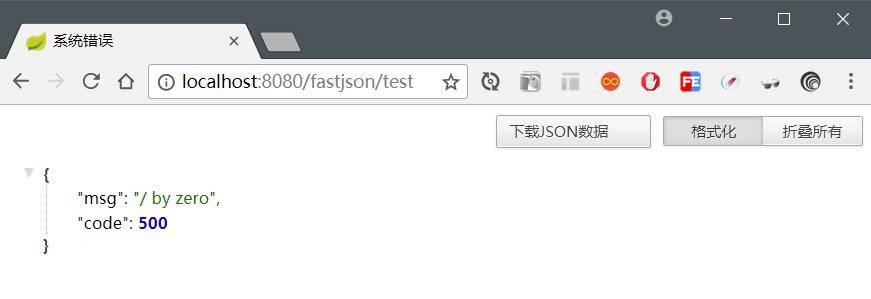
启动项目,访问 http://localhost:8080/fastjson/test,结果如下图:
我们还可以自定义异常,在全局异常的处理类中捕获和判断,从而对不同的异常做出不同的处理。
十、文件上传和下载
10.1 添加依赖
<!-- 工具 --><dependency><groupId>commons-io</groupId><artifactId>commons-io</artifactId><version>2.4</version></dependency>
10.2 实现
编写一个实体类,用于封装返回信息:
public class FileInfo {private String path;public FileInfo(String path) {this.path = path;}public String getPath() {return path;}public void setPath(String path) {this.path = path;}}
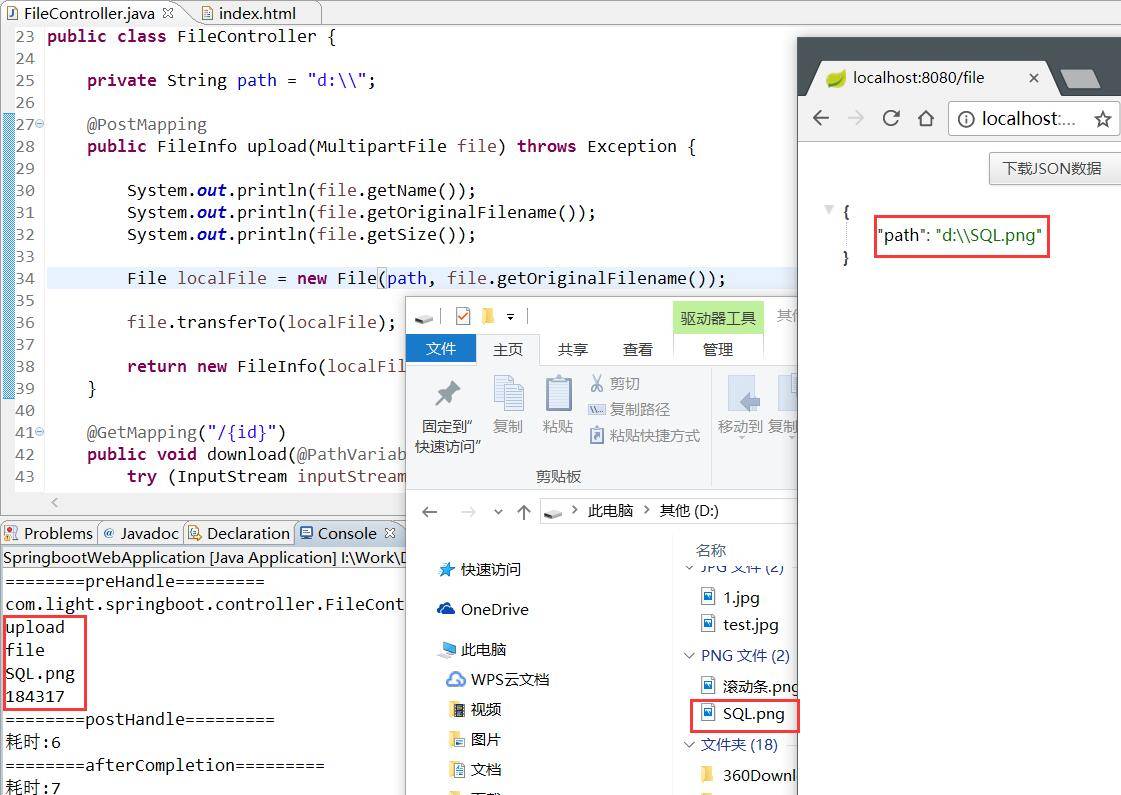
编写 Controller,用于处理文件上传下载:
@RestController@RequestMapping("/file")public class FileController {private String path = "d:\\";@PostMappingpublic FileInfo upload(MultipartFile file) throws Exception {System.out.println(file.getName());System.out.println(file.getOriginalFilename());System.out.println(file.getSize());File localFile = new File(path, file.getOriginalFilename());file.transferTo(localFile);return new FileInfo(localFile.getAbsolutePath());}@GetMapping("/{id}")public void download(@PathVariable String id, HttpServletRequest request, HttpServletResponse response) {try (InputStream inputStream = new FileInputStream(new File(path, id + ".jpg"));OutputStream outputStream = response.getOutputStream();) {response.setContentType("application/x-download");response.addHeader("Content-Disposition", "attachment;filename=" + id + ".jpg");IOUtils.copy(inputStream, outputStream);} catch (Exception e) {e.printStackTrace();}}}
基本上都是在学习 javaweb 时用到的 API。
文件上传测试结果如下图:
十一、CORS 支持
前端页面:
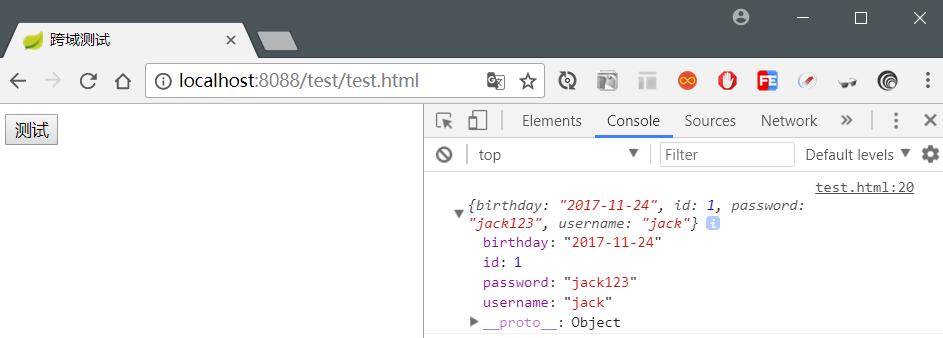
<!DOCTYPE html><html><head><meta charset="UTF-8"><title>跨域测试</title></head><body><button id="test">测试</button><script type="text/javascript" src="jquery-1.12.3.min.js"></script><script type="text/javascript">$(function() {$("#test").on("click", function() {$.ajax({"url": "http://localhost:8080/fastjson/test","type": "get","dataType": "json","success": function(data) {console.log(data);}})});});</script></body></html>
通过 http 容器启动前端页面代码,笔者使用 Sublime Text 的插件启动的,测试结果如下:

从图中可知,前端服务器启动端口为 8088 与后端服务器 8080 不同源,因此出现跨域的问题。
现在开始解决跨域问题,可以两种维度控制客户端请求。
粗粒度控制:
方式一
@Configurationpublic class WebConfig {@Beanpublic WebMvcConfigurer corsConfigurer() {return new WebMvcConfigurerAdapter() {@Overridepublic void addCorsMappings(CorsRegistry registry) {registry.addMapping("/fastjson/**").allowedOrigins("http://localhost:8088");// 允许 8088 端口访问}};}}
方式二
@Configurationpublic class WebConfig extends WebMvcConfigurerAdapter{@Overridepublic void addCorsMappings(CorsRegistry registry) {registry.addMapping("/fastjson/**").allowedOrigins("http://localhost:8088");// 允许 8088 端口访问}}
配置后,重新发送请求,结果如下:
细粒度控制:
在 FastJsonController 类中的方法上添加 @CrossOrigin(origins="xx") 注解:
@RequestMapping("/test")@CrossOrigin(origins="http://localhost:8088")public User test() {User user = new User();user.setId(1);user.setUsername("jack");user.setPassword("jack123");user.setBirthday(new Date());return user;}
在使用该注解时,需要注意 @RequestMapping 使用的请求方式类型,即 GET 或 POST。
十二、整合 WebSocket
12.1 添加依赖
<dependency><groupId>org.springframework.boot</groupId><artifactId>spring-boot-starter-websocket</artifactId></dependency>
12.2 实现方式
方式一:
该方式只适用于通过 jar 包直接运行项目的情况。
WebSocket 配置类:
@Configurationpublic class WebSocketConfig {@Beanpublic ServerEndpointExporter serverEndpointExporter() {return new ServerEndpointExporter();}}
WebSocket 处理类:
@ServerEndpoint(value = "/webSocketServer/{userName}")@Componentpublic class WebSocketServer {private static final Set<WebSocketServer> connections = new CopyOnWriteArraySet<>();private String nickname;private Session session;private static String getDatetime(Date date) {SimpleDateFormat format = new SimpleDateFormat("yyyy-MM-dd HH:mm:ss");return format.format(date);}@OnOpenpublic void start(@PathParam("userName") String userName, Session session) {this.nickname = userName;this.session = session;connections.add(this);String message = String.format("* %s %s", nickname, "加入聊天!");broadcast(message);}@OnClosepublic void end() {connections.remove(this);String message = String.format("* %s %s", nickname, "退出聊天!");broadcast(message);}@OnMessagepublic void pushMsg(String message) {broadcast("【" + this.nickname + "】" + getDatetime(new Date()) + " : " + message);}@OnErrorpublic void onError(Throwable t) throws Throwable {}private static void broadcast(String msg) {// 广播形式发送消息for (WebSocketServer client : connections) {try {synchronized (client) {client.session.getBasicRemote().sendText(msg);}} catch (IOException e) {connections.remove(client);try {client.session.close();} catch (IOException e1) {e.printStackTrace();}String message = String.format("* %s %s", client.nickname, "断开连接");broadcast(message);}}}}
前端页面:
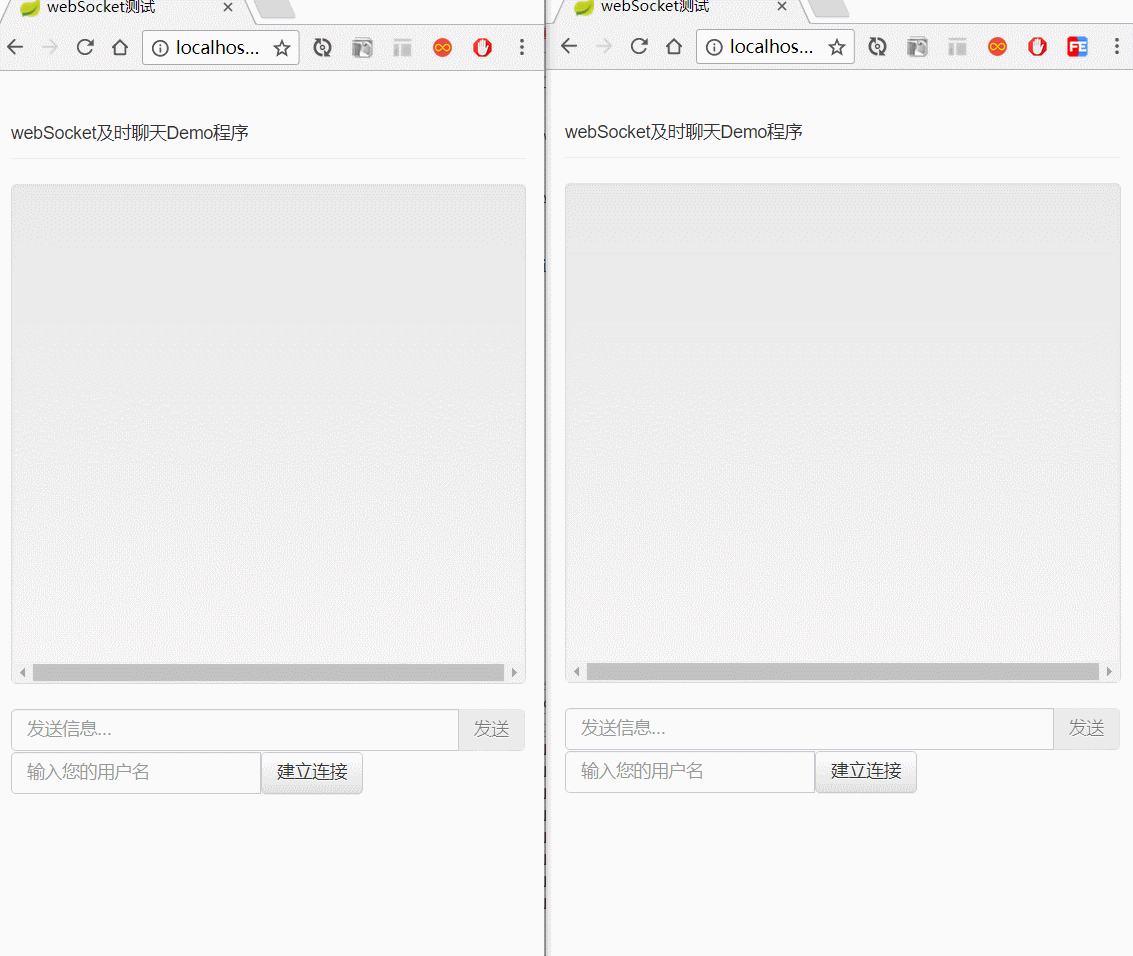
<!DOCTYPE html><html><head><meta charset="UTF-8"><link rel="stylesheet" href="css/bootstrap.min.css"><link rel="stylesheet" href="css/bootstrap-theme.min.css"><script src="js/jquery-1.12.3.min.js"></script><script src="js/bootstrap.js"></script><style type="text/css">#msg {height: 400px;overflow-y: auto;}#userName {width: 200px;}#logout {display: none;}</style><title>webSocket测试</title></head><body><div><div id="tou">webSocket及时聊天Demo程序</div><p id="logout"><button class="btn btn-danger" id="logout-btn">退出</button></p><div id="msg"></div><div><div><input type="text" placeholder="发送信息..." id="message"> <span><button class="btn btn-default" type="button" id="send"disabled="disabled">发送</button></span></div><div><input id="userName" type="text" name="userName" placeholder="输入您的用户名" /><button class="btn btn-default" type="button" id="connection-btn">建立连接</button></div><!-- /input-group --></div><!-- /.col-lg-6 --></div><!-- /.row --></div><script type="text/javascript">$(function() {var websocket;$("#connection-btn").bind("click", function() {var userName = $("#userName").val();if (userName == null || userName == "") {alert("请输入您的用户名");return;}connection(userName);});function connection(userName) {var host = window.location.host;if ('WebSocket' in window) {websocket = new WebSocket("ws://" + host +"/webSocketServer/" + userName);} else if ('MozWebSocket' in window) {websocket = new MozWebSocket("ws://" + host +"/webSocketServer/" + userName);}websocket.onopen = function(evnt) {$("#tou").html("链接服务器成功!")$("#send").prop("disabled", "");$("#connection-btn").prop("disabled", "disabled");$("#logout").show();};websocket.onmessage = function(evnt) {$("#msg").html($("#msg").html() + "<br/>" + evnt.data);};websocket.onerror = function(evnt) {$("#tou").html("报错!")};websocket.onclose = function(evnt) {$("#tou").html("与服务器断开了链接!");$("#send").prop("disabled", "disabled");$("#connection-btn").prop("disabled", "");$("#logout").hide();}}function send() {if (websocket != null) {var $message = $("#message");var data = $message.val();if (data == null || data == "") {return;}websocket.send(data);$message.val("");} else {alert('未与服务器链接.');}}$('#send').bind('click', function() {send();});$(document).on("keypress", function(event) {if (event.keyCode == "13") {send();}});$("#logout-btn").on("click", function() {websocket.close(); //关闭TCP连接});});</script></body></html>
演示图如下:
如果使用该方式实现 WebSocket 功能并打包成 war 运行会报错:
javax.websocket.DeploymentException: Multiple Endpoints may not be deployed to the same path
方式二:
该方式适用于 jar 包方式运行和 war 方式运行。
WebSocket 配置类:
@Configuration@EnableWebSocketpublic class WebSocketConfig implements WebSocketConfigurer {@Overridepublic void registerWebSocketHandlers(WebSocketHandlerRegistry registry) {registry.addHandler(webSocketServer(), "/webSocketServer/*");}@Beanpublic WebSocketHandler webSocketServer() {return new WebSocketServer();}}
WebSocket 处理类:
public class WebSocketServer extends TextWebSocketHandler {private static final Map<WebSocketSession, String> connections = new ConcurrentHashMap<>();private static String getDatetime(Date date) {SimpleDateFormat format = new SimpleDateFormat("yyyy-MM-dd HH:mm:ss");return format.format(date);}/*** 建立连接*/@Overridepublic void afterConnectionEstablished(WebSocketSession session) throws Exception {String uri = session.getUri().toString();String userName = uri.substring(uri.lastIndexOf("/") + 1);String nickname = URLDecoder.decode(userName, "utf-8");connections.put(session, nickname);String message = String.format("* %s %s", nickname, "加入聊天!");broadcast(new TextMessage(message));}/*** 断开连接*/@Overridepublic void afterConnectionClosed(WebSocketSession session, CloseStatus status) throws Exception {String nickname = connections.remove(session);String message = String.format("* %s %s", nickname, "退出聊天!");broadcast(new TextMessage(message));}/*** 处理消息*/@Overrideprotected void handleTextMessage(WebSocketSession session, TextMessage message) throws Exception {String msg = "【" + connections.get(session) + "】" + getDatetime(new Date()) + " : " + message.getPayload();broadcast(new TextMessage(msg));}private static void broadcast(TextMessage msg) {// 广播形式发送消息for (WebSocketSession session : connections.keySet()) {try {synchronized (session) {session.sendMessage(msg);}} catch (Exception e) {connections.remove(session);try {session.close();} catch (Exception e2) {e2.printStackTrace();}String message = String.format("* %s %s", connections.get(session), "断开连接");broadcast(new TextMessage(message));}}}}
运行结果与上图一致。
十三、整合 Swagger2
13.1 添加依赖
<dependency><groupId>io.springfox</groupId><artifactId>springfox-swagger2</artifactId><version>2.7.0</version></dependency><dependency><groupId>io.springfox</groupId><artifactId>springfox-swagger-ui</artifactId><version>2.7.0</version></dependency>
13.2 配置
重新创建一个配置类,如下:
@Configuration@EnableSwagger2public class Swagger2Configuration {@Beanpublic Docket accessToken() {return new Docket(DocumentationType.SWAGGER_2).groupName("api")// 定义组.select() // 选择那些路径和 api 会生成 document.apis(RequestHandlerSelectors.basePackage("com.light.springboot.controller")) // 拦截的包路径.paths(PathSelectors.regex("/*/.*"))// 拦截的接口路径.build() // 创建.apiInfo(apiInfo()); // 配置说明}private ApiInfo apiInfo() {return new ApiInfoBuilder()//.title("Spring Boot 之 Web 篇")// 标题.description("spring boot Web 相关内容")// 描述.termsOfServiceUrl("http://www.extlight.com")//.contact(new Contact("moonlightL", "http://www.extlight.com", "445847261@qq.com"))// 联系.version("1.0")// 版本.build();}}
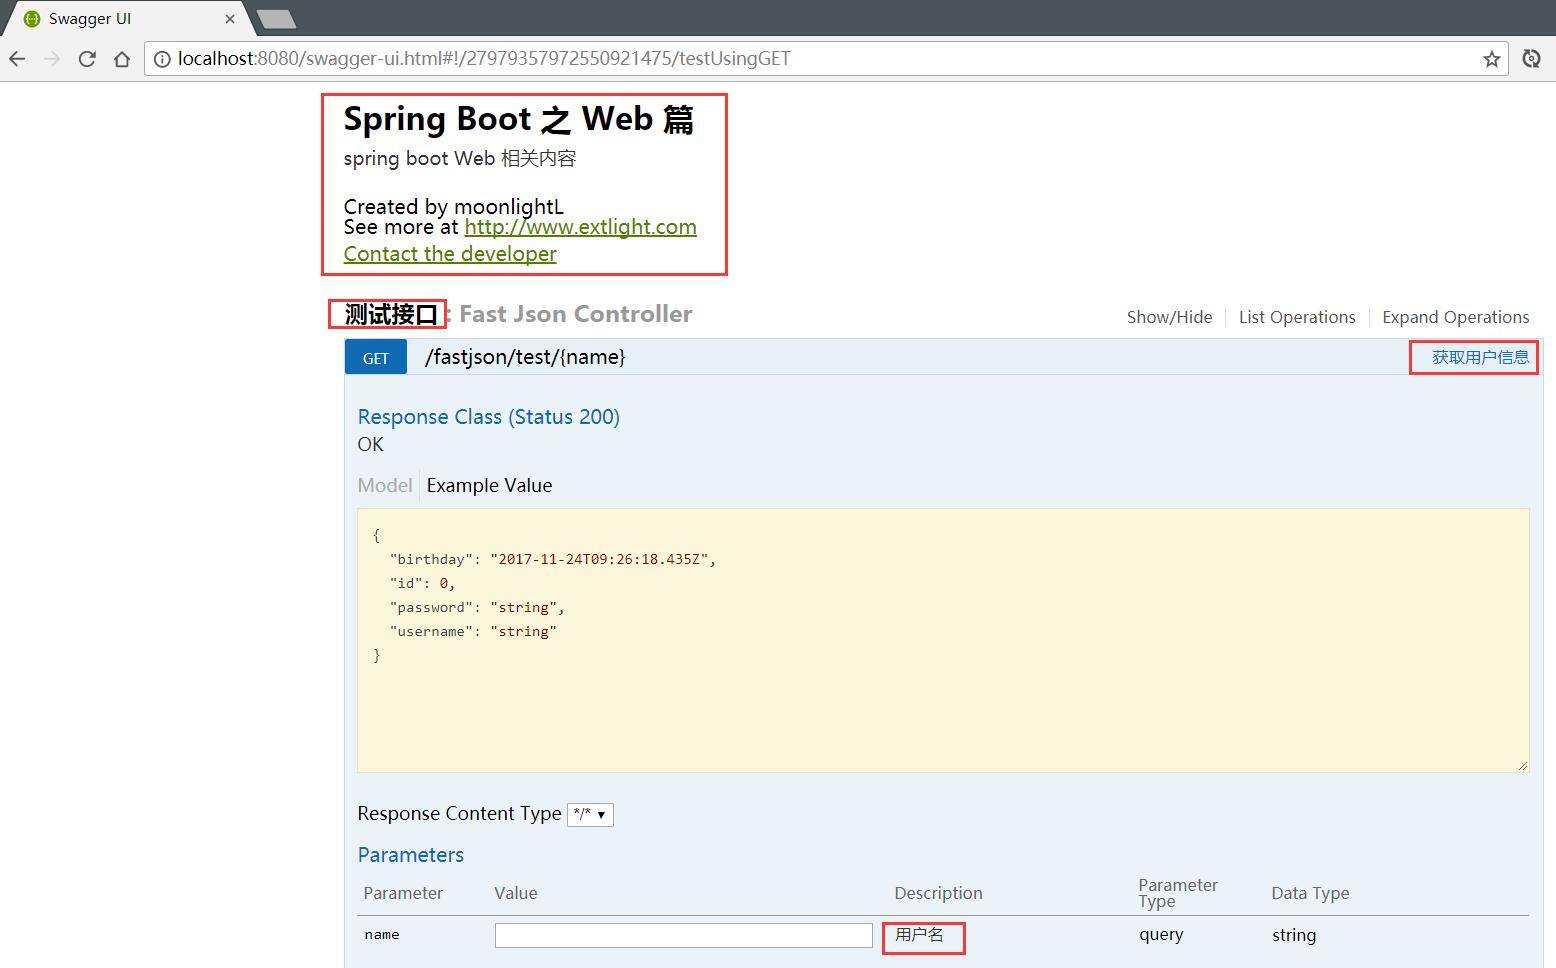
为了能更好的说明接口信息,我们还可以在 Controller 类上使用 Swagger2 相关注解说明信息。
我们以 FastJsonController 为例:
@Api(value = "FastJson测试", tags = { "测试接口" })@RestController@RequestMapping("fastjson")public class FastJsonController {@ApiOperation("获取用户信息")@ApiImplicitParam(name = "name", value = "用户名", dataType = "string", paramType = "query")@GetMapping("/test/{name}")public User test(@PathVariable("name") String name) {User user = new User();user.setId(1);user.setUsername(name);user.setPassword("jack123");user.setBirthday(new Date());return user;}}
注意,上边的方法是用 @GetMapping 注解,如果只是使用 @RequestMapping 注解,不配置 method 属性,那么 API 文档会生成 7 种请求方式。
启动项目,打开浏览器访问 http://localhost:8080/swagger-ui.html。结果如下图:


评论